Introduction
This tutorial is for MySQL, let’s discuss How to Create a table with GUI and CLI.
GUI tools to connect with MySQL like Workbench, Beekeeper Studio, dbForge Studio, etc.
So let’s use Workbench for the GUI and Linux Command line for the command line.
In the first step we create the database, then create a table and finally we will insert the database in MySQL.
So the following topic that will be discussed in this tutorial are as follows,
- How to create a table in MySQL with CLI.
- How to create a table in MySQL with GUI (Workbench).
If you want to upgrade MySQL version to another version then refer the link.
How to create table in MySQL with CLI
To create the table we need to create a database first, let’s connect to the mysql server via command-line.
$ mysql -h localhost -uUsername -pPassword
-h: This parameter is to connect MySQL. Suppose I have an RDS setup on AWS, then put the RDS host instead of localhost.
-u: Put the Username for the MySQL.
-p: Put the Password for MySQL.
mysql> create database name_of_the_Database;

Example:
mysql> create database tastethelinux;
OUTPUT:

Query OK, 1 row affected (0.22 sec)
Then check the created database by “show databases”. you can see the created database.
mysql> show databases;
OUTPUT:

+----------------------------------+
 | Database                          |
+----------------------------------+
 | information_schema    |
 | mysql                                 |
 | performance_schema  |
 | sys                                      |
 | tastethelinux                  |
+----------------------------------+
5 rows in set (0.01 sec)
If you want to switch or connect to the database, then the USE statement and database name execute in MySQL.
> use tastethelinux;
OUTPUT:

Database changed
| Name | Course | Fees |
|---|---|---|
| Ashish | Linux | 20000 |
| Ashish M | Cyber Security | 40000 |
We have to create a 3 column Name, Course, and Fees.
mysql> create table course(
    -> Name VARCHAR(50),
    -> Course VARCHAR(50),
    -> Fees INT
    -> );
Query OK, 0 rows affected (0.67 sec)

mysql>
Verify the created table by using describe command:
mysql> describe course;
+-----------+------------------+--------+-------+-------------+---------+
| Field     |  Type              | Null  | Key  | Default   | Extra |
+-----------+------------------+--------+-------+-------------+---------+
| Name   | varchar(50)  | YES   |          | NULL       |             |
| Course | varchar(50)  | YES   |          | NULL       |             |
| Fees      | int                   | YES  |           | NULL       |            |
+-----------+------------------+-------+--------+--------------+--------+
3 rows in set (0.01 sec)

mysql>
Now let’s insert our first data inside the table.
mysql> insert into course values("Ashish", "Linux", 20000);
Query OK, 1 row affected (0.19 sec)

mysql>
mysql> insert into course values("Ashish. M", "Cyber Security", 40000);
Query OK, 1 row affected (0.22 sec)
So we have inserted the data now let’s use the SELECT command to check the inserted data into the table.
mysql>
mysql> select * from course;
+---------------+--------------------- -+-----------+
| Name         | Course                | Fees     |
+---------------+-----------------------+-----------+
| Ashish        | Linux                   | 20000  |
| Ashish. M  | Cyber Security | 40000  |
+---------------+-----------------------+-----------+
2 rows in set (0.00 sec)

mysql>
How to create table using Workbench GUI.
So to create a table using Workbench, we will connect to MySQL Workbench. Then create the database, then the table, and insert some data.
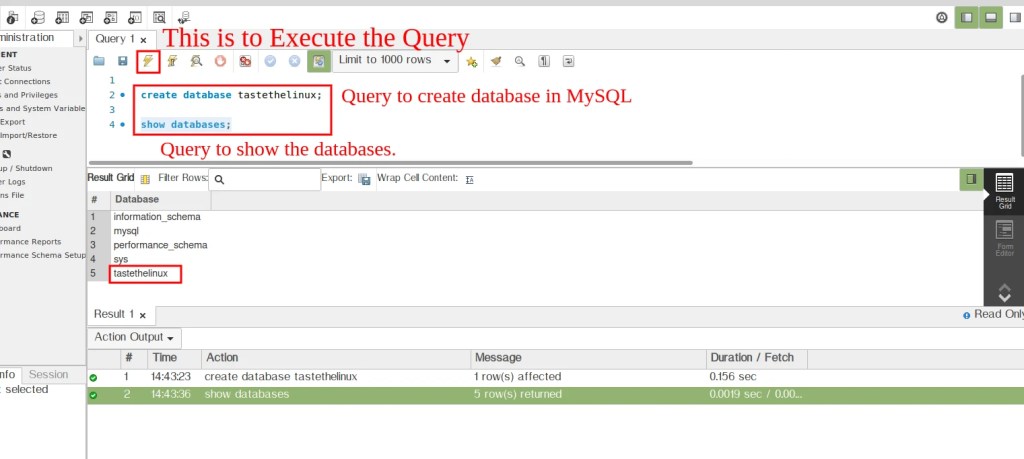
> create database tastethelinux;

> show databases;
In MySQL workbench, there are 3 columns,
- Query Tab to write and execute the Query.
- Result Grid for Results of the Output.
- Action Output has the action performed on the server.
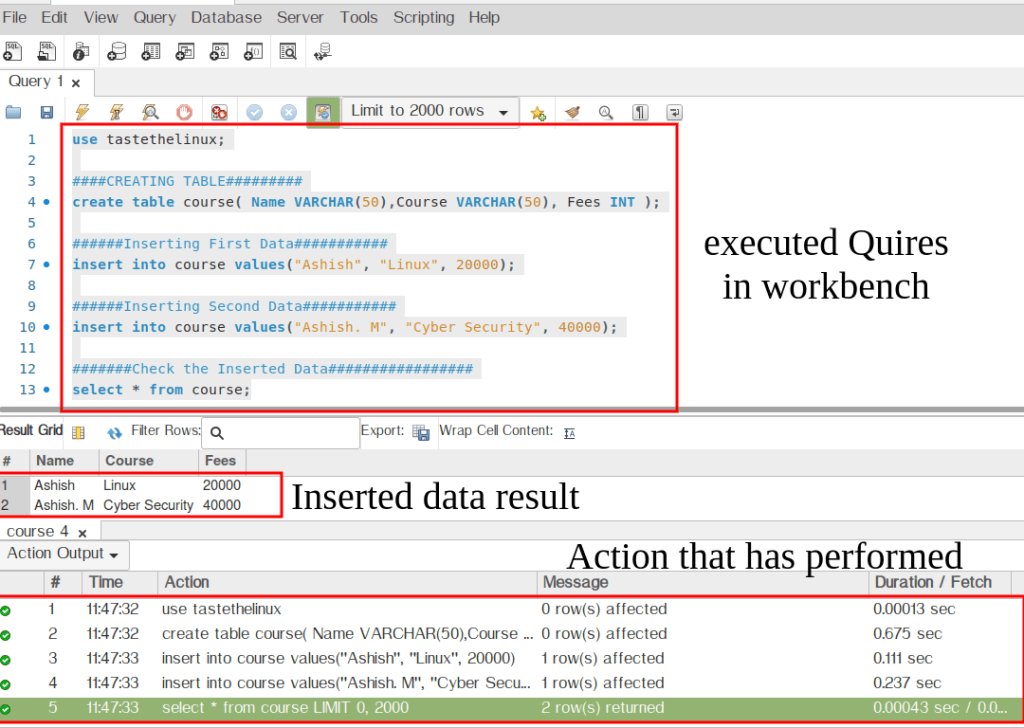
use tastethelinux;

####CREATING TABLE#########
create table course( Name VARCHAR(50),Course VARCHAR(50), Fees INT );

######Inserting First Data###########
insert into course values("Ashish", "Linux", 20000);

######Inserting Second Data###########
insert into course values("Ashish. M", "Cyber Security", 40000);

#######Check the Inserted Data#################
select * from course;
So we have inserted the 2 records into the table. And also verify the data by using the select command.
Conclusion
So we have created the table with the command line as well as Workbench GUI. We have created the database, then the table and then inserted the data into the table.
Also, we can see the GUI is very simple to use, you can hit as many Quires you want. Any issue or feedback please feel free to comment.

Give your valuable time