So, we will see installation guide “How to Install Linux Mint 20.2(UMA) on Virtualbox” Step by Step, but before installing Linux Mint 20.2 will see the “System Requirement”.
- System Requirement
- Require 2 GB RAM (But for the Comfortable use the recommended Size for the RAM is 4 GB).
- 20 GB Disk Space required to Install Linux Mint 20.2.
- 1024×768 resolution (on lower resolutions, press ALT to drag windows with the mouse if they don’t fit in the screen)
To Install the Linux Mint 20.2 for Desktop follow the Link.
STEP 1: Download the ISO for Linux Mint 20.2
The Linux Mint 20.2 has three variants Cinnamon, MATE and Xfce.
Just click the links to download the ISO Files, or you can go to the Linux Mint Website to download the ISO of your choice
STEP 2: Configure Virtualbox to Install Linux Mint 20.2
To download the Virtual box on windows follow the link, for Linux distributions follow this link.
Now follow the steps to configure the Virtualbox for the Linux Mint 20.2


STEP 3: Install Linux Mint 20.2(UMA) Step by Step Guide.
So After the booting it will show you the welcome screen with many options Select “Start Linux Mint” and Press Enter.

The Live booting has been started, you can Click on the CD icon to start the installation for Linux Mint.
![Install Linux Mint 20.2(Uma) from USB [Screenshots]](https://i0.wp.com/tastethelinux.com/wp-content/uploads/2021/07/LI-2.webp?resize=644%2C483&ssl=1)
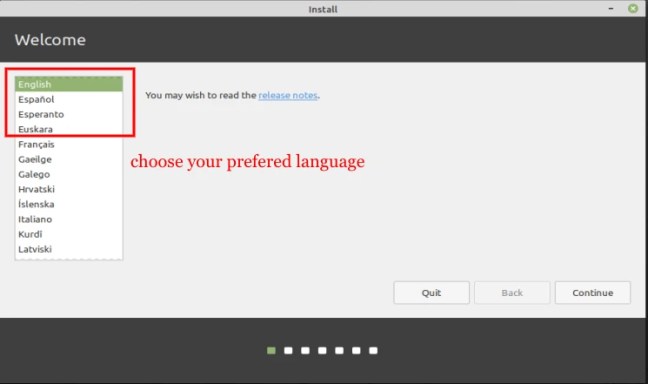
Then choose your preferred language, I am selecting “English” and click on Continue.
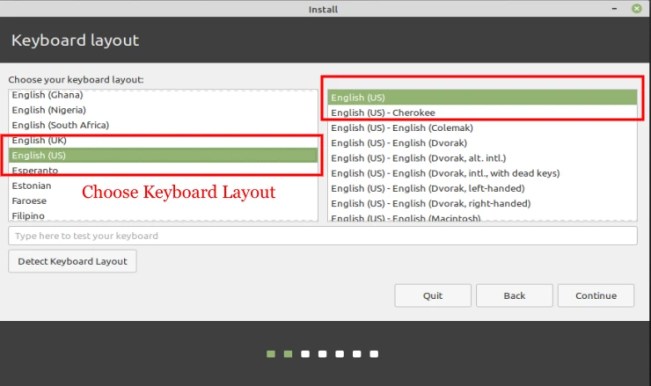
So now it will ask for the “Keyboard Layout” select and click on Continue.
So, if you have the internet connections you can select the third party apps to download and Install, then tick the check box and “Continue”
![Install Linux Mint 20.2(Uma) from USB [Screenshots]](https://i0.wp.com/tastethelinux.com/wp-content/uploads/2021/07/LI-5.webp?resize=651%2C366&ssl=1)
Select Erase disk and Click on “Install Now”, Just be carefully while choosing the first option because it will erase all the data on the disk.

If you have to create your own partitions, you can select the option for “something else”, then create the partition and Install now.
![Install Linux Mint 20.2(Uma) from USB [Screenshots]](https://i0.wp.com/tastethelinux.com/wp-content/uploads/2021/07/LI-7.webp?w=1160&ssl=1)
Then it will give the warning to Write the changes to disks, after continue it will format the partitions.
Now select the Time Zone, I have select my time zone, you can select the time zone of your choice and click on Continue.

So, next step is to fill the login details, like Hostname, Username and password and click on “Continue”.
![Install Linux Mint 20.2(Uma) from USB [Screenshots]](https://i0.wp.com/tastethelinux.com/wp-content/uploads/2021/07/LI-9.webp?resize=679%2C381&ssl=1)
That’s It Done, It will start the installation part and then install the packages, and once the installation will complete then, it will ask for reboot.
![Install Linux Mint 20.2(Uma) from USB [Screenshots]](https://i0.wp.com/tastethelinux.com/wp-content/uploads/2021/07/LI-11.webp?w=1160&ssl=1)
Just put the login details and now you can use the Linux Mint 20.2. Enjoy!
![Install Linux Mint 20.2(Uma) from USB [Screenshots]](https://i0.wp.com/tastethelinux.com/wp-content/uploads/2021/07/LI-12.webp?resize=702%2C491&ssl=1)
After login you will find the Welcome Screen for the Linux Mint 20.2.
![Install Linux Mint 20.2(Uma) from USB [Screenshots]](https://i0.wp.com/tastethelinux.com/wp-content/uploads/2021/07/LI-13.webp?resize=700%2C361&ssl=1)
Want to learn Linux Basic Commands, Follow the link. Want to Install MySQL follow the Link.

One Reply to “Install Linux Mint 20.2 on Virtualbox [with Screenshots]”